Backup Your Mobile with Backup Your Mobile
s
 Backup Your Mobile with Backup Your Mobile
There are countless situations where it’s necessary to back up your device. Whether it be reflashing a ROM or installing a tricky mod, a good a reliable app that backs up your device is always essential to have in the app drawer. Introducing Backup Your Mobile by XDA Forum Member lanx.
Backup Your Mobile is a simple, yet practical app that allow users to backup a whole range of data on the Android device.
Delivered with a straightforward and easily navigable user interface, Backup Your Mobile backs up contacts, call logs, SMS, and system settings among many other options. However, it must be stressed that the app does not back up apps. Users can enable the automatic backup feature with the options to adjust the frequency of backups and the start time of backups. Backup Your Mobile also support backups to cloud services, being Google Drive and Dropbox, so backups don’t take up valuable space on the device or its external storage. Not only uploading to cloud storage, the app also support the reverse, allowing users to download previously uploaded backups from the selected cloud.
With Backup Your Mobile, lanx has definitely developed a useful and practical app for many users. So if you’re a user of Android version 2.2 or newer and interested in Backup Your Mobile, the app can be downloaded for free from the Play store with more details in theoriginal thread.
official : http://www.xda-developers.com
Artikel Lainnya :
Android
Root Smartfren Andromax C | Hisense AD686g Without PC Easily
s
How to Root Smartfren Andromax C | Hisense AD686g Without PC Easily
Immediately, for my friend who wanted to directly Root Smartfren Andromax C follow the steps below.But before, my friend had to understand
- Root may cause the warranty void. do Unroot first before bringing to the Service Center Smartfren
- Everything happens because rooting is your own responsibility
Well here's Tutorial or How To Root Smartfren Andromax C | Hisense ad686g Without PC Easily
- Activate the first "Source Unknown or Unknown sources" on the Android dude in a "Settings >> Security"
- Download and Install Applications in Android Framaroot Buddy Framaroot Application Download Here
- After that run the application and then select Superuser or SuperSU you want to use. (select SuperSU recommendations, let's easy to unroot it)

How to Root Smartfren Andromax C
- Further below there are a few methods exploit like Gandalf or Aragon. select "Gandalf"
- If Gandalf does not work, try using Aragon.

How to Root Smartfren Andromax C Without PC
- Upon notification to successful Root, Restart Andromax-C Buddies
- And check whether SuperSU / Superuser has been installed in your Android. or can check by using Root Checker.
Well that's it, Attention All the above is my own doing in my C HP Smartfren Andromax. Prove it in Screenshotnya see, there are two CDMA Signal (X +1 EVDO) and GSM
Commenting please if less obvious
Artikel Lainnya :
Android
HTC One Android 4.2.2 update goes live in UK today (Spain too)
sHTC One Android 4.2.2 update goes live in UK today (Spain too)
HTC UK has announced that it will begin rolling out the Android 4.2.2 update for HTC One smartphone today. The update will be available over-the-air (OTA) and you can check for it manually by going to Settings > About > Software Updates > Check now.
The update is expected to bring lock-screen widgets, notification bar quick settings and more to HTC One smartphone, you can check out the expected change-log later in the post.
HTC One Android 4.2.2 update change-log:
- Launcher bar enhancements
- Lock-screen widgets
- Home button options
- New quick settings panel in notification shade
- Battery level in status bar
- Gallery app improvements
- AE/AF enhancements in the camera
- New Zoe file format
- Video highlights
- Daydreams
- Widget panel rearrangement
Update: Android 4.2.2 for HTC One live in Spain too
HTC One Glamour Red colour version also available in UK
HTC UK has also confirmed that Glamour Red colour version of HTC One smartphone is now available in shops around UK. The Red version costs same as Sliver or Black variants of the phone. The phone packs 4.7-inch full HD display and is powered by 1.7GHz quad-core Snapdragon 600 processor.
source androidos
Artikel Lainnya :
Android
HTC One in Red finally available in the UK
s
After a few months of waiting, last month the folks from HTC finally announced the Glamour Red HTC One would be hitting shelves and available to all. It was first spotted online the day they announced the HTC One, but it was never heard from again. Now however, those in the UK can get this impressive aluminum wrapped flagship smartphone in a brilliant red color variation. Check it out below.

As you expected, this is the same phone we’ve already reviewed and absolutely love. You’ll enjoy a 4.7-inch 1080p full HD display, Android Jelly Bean, Sense UI 5 with Blinkfeed news features, Zoe, and that quality Ultrapixel camera on board. Then of course it’s all powered by Qualcomm’s quad-core Snapdragon 600 processor and 2GB of RAM. So yes, it’s the same phone, only that aluminum frame is now bright Glamour Red. Who’s interested?
it’s all powered by Qualcomm’s quad-core Snapdragon 600 processor and 2GB of RAM. So yes, it’s the same phone, only that aluminum frame is now bright Glamour Red. Who’s interested?


VIA: Phones 4U
source androidcommunity
Artikel Lainnya :
Android
Getting Started with Android Development | Treehouse Quick Tip
s
It’s easy to start developing apps for Android. To get started, you’ll need to download a few tools. This video will show you how to get everything you’ll need.
The fastest way to get everything you’ll need is to download the Android bundle from the Treehouse website:
http://goo.gl/jFSg5
This file contains everything you need to get started developing with Eclipse. If you want to get everything separately (Java, Eclipse, and the Android SDK) you can follow along with the video and use the links below.
Getting Started with Android Development | Treehouse Quick Tip
The first thing you need is Java:
Next get the Android SDK from the Android developers’ site:
http://developer.android.com/sdk/index.html
http://developer.android.com/sdk/index.html
Now you’ll want to get Eclipse Classic:
http://www.eclipse.org/downloads/
http://www.eclipse.org/downloads/
In Eclipse, you’ll first want to install the ADT Plugin. Finally, you’ll want to setup an Android emulator. Now you are ready to start coding with everything you need to start building apps!
Stay tuned for more Android Development Tips.
source blog teamtreehouse
Artikel Lainnya :
Android
The Missing Widget in the Android SDK: SmartImageView
sThe Missing Widget in the Android SDK: SmartImageView

Displaying an image from the web in an Android app is unnecessarily hard to do the right way. You need to download it byte by byte from the Internet, store it in a Bitmap object, and then set this Bitmap as the content of the ImageView. And that’s just the minimal solution; you also want to cache the image so you don’t need to download it each time the ImageView is created, and you ideally want to perform the download off the main UI thread so that your app remains responsive for the user. The last thing you want to do is spend a long time downloading an image over a poor network connection and leave your app in a locked state until it completes.
“This does Bitmap reading and decoding on the UI thread, which can cause a latency hiccup. If that’s a concern, consider using setImageDrawable(android.graphics.drawable.Drawable) or setImageBitmap(android.graphics.Bitmap) and BitmapFactory instead.”
I’m perplexed that this alternative solution isn’t available in the SDK, but thankfully a few independent developers have made alternatives available as open-source software that we can use in our own applications. The best I’ve found is a widget called SmartImageView that’s available from James Smith (@loopj). Let’s take a look at an example for populating an ImageView using somebody’s Twitter profile image.
Using SmartImageView Instead of ImageView
The source code for SmartImageView is available from GitHub, but to use it we just need to download the latest JAR file from the SmartImageView page. Once downloaded, we need to add the JAR file in the “lib” (or “libs”) directory of our Android project.
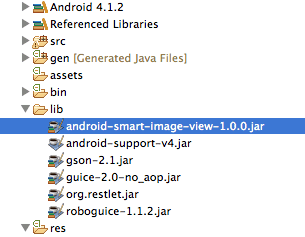
Before we forget, let’s make sure that we’ve added the permission in our AndroidManifest.xml file to access the Internet:
<uses-permission android:name="android.permission.INTERNET" />
Now, let’s start with adding a SmartImageView in an XML layout, just like we would do with a normal ImageView. There are two important things to notice here. First is to remember that, when using custom UI components, we need to include the full package name, like
com.loopj.android.image.SmartImageView. Second, because SmartImageView extends ImageView, we can use all the same attributes and methods of ImageView in addition to the added functionality.<LinearLayout xmlns:android="http://schemas.android.com/apk/res/android"
android:layout_width="fill_parent"
android:layout_height="wrap_content" >
<com.loopj.android.image.SmartImageView
android:id="@+id/profileImage"
android:layout_width="48dp"
android:layout_height="48dp"
android:scaleType="fitCenter" />
</LinearLayout>
Now, all we need to do is get a reference to the ImageView from the layout like normal and call the
setImageUrl() method with the URL as a String parameter:public class MainActivity extends Activity {
@Override
public void onCreate(Bundle savedInstanceState) {
super.onCreate(savedInstanceState);
setContentView(R.layout.activity_main);
SmartImageView profileImage = (SmartImageView) findViewById(R.id.profileImage);
profileImage.setImageUrl("https://api.twitter.com/1/users/profile_image?screen_name=bendog24&size=normal");
}
}
That’s it! The SmartImageView will download the image asynchronously and load it when it’s complete. It will also cache the image for reuse so we don’t need to re-download it each time we run our app!
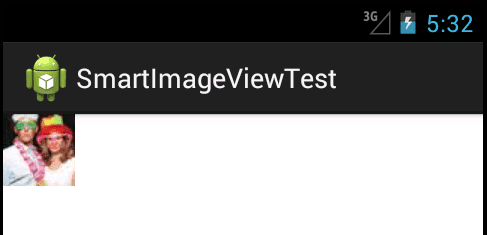
If we want to clear out the image, we just call the setImageUrl() method with a blank URL. We can optionally provide a second parameter: the Resource ID of a default image to use instead:
profileImage.setImageUrl("", R.drawable.ic_launcher);
We can also use the SmartImageView to load an image from the user’s Contacts app, which makes use of contact data exposed by an Android Content Provider:
profileImage.setImageUrl(contactAddressBookId);
There are a few other solutions like this, but SmartImageView is so easy to setup and use, and it has worked pretty reliably for me so far. If you know of any similar libraries that are as easy as this, let us know in the comments!
source blog teamtreehouse
Artikel Lainnya :
Android
The One-Stop Android SDK/Eclipse/ADT Installer You Always Wanted
sThe One-Stop Android SDK/Eclipse/ADT Installer You Always Wanted

Getting started with Android development can be a little daunting to newcomers. There are a few different downloads and configuration steps, and quite a few fail points, especially if handcuffed by a zealous IT security team. Wouldn’t it be nice if you could download and install one package and be ready to rock right out of the gate? Those iOS developers have it so easy! Well, now you can too, with the handy dandyTreehouse Android Development Bundle!
“But I like configuring proxies and assembling eight different components I’ve never worked with before!”Says no one. Admittedly, the documentation for setting up your Android environment has improved greatly, but it’s still a time-consuming and confusing process for new Android developers.
Feel free to download and try out our bundles for Mac OS X or Windows. Check out Stage 1 of Build an Android Crystal Ball App. Specifically, go to the page for the video Android Setup and the Crystal Ball Project and select the bundle that corresponds to your operating system from the Download links below the video. Unzip the bundle, run the “initial_setup” script, and start coding!
If you want to set up a bundle for your own use or to share with students or a team, follow the instructions below.
“But I like configuring proxies and assembling eight different components I’ve never worked with before!”Says no one. Admittedly, the documentation for setting up your Android environment has improved greatly, but it’s still a time-consuming and confusing process for new Android developers.
Feel free to download and try out our bundles for Mac OS X or Windows. Check out Stage 1 of Build an Android Crystal Ball App. Specifically, go to the page for the video Android Setup and the Crystal Ball Project and select the bundle that corresponds to your operating system from the Download links below the video. Unzip the bundle, run the “initial_setup” script, and start coding!
If you want to set up a bundle for your own use or to share with students or a team, follow the instructions below.
How to Create Your Own Android Development Bundle
The goal here is to create a self-contained directory where all the components have relative paths to each other. The main problem with using relative paths is that the relative path for the Android SDK in Eclipse breaks the AVD Manager. It won’t allow you to run existing AVDs or create new ones. Enter the “initial_setup” script! This little script should be run one time when the bundle is first unzipped. It sets the Android SDK to an absolute path based on where the user unzips the package, and it also creates an initial AVD.
The key to the script is updating the Eclipse ADT Plugin preferences to use the absolute path of the Android SDK. This is accomplished with this line from the script below. Note that the path for the preferences file is relative to the workspace (and the workspace path is set as relative to the Eclipse installation).
echo com.android.ide.eclipse.adt.sdk=$sdk_path >> ./workspace/.metadata/.plugins/org.eclipse.core.runtime/.settings/com.android.ide.eclipse.adt.prefs MAC INSTRUCTIONS
Here’s what the final unzipped directory structure will look like. This is what we’re building:

- Create the root directory (android_dev_environment)
- Copy the Android SDK in (android-sdk-macosx)
- Copy in eclipse:
- Start with a clean version of Eclipse
- Run Eclipse. When prompted for a workspace, enter “../../../../workspace” (this will create the workspace directory in our root).
- Install the ADT Plugin via the “Install new software” option in Eclipse (https://dl-ssl.google.com/android/eclipse/). Restart when done.
- Change the Android SDK path in Eclipse preferences to be relative: “../../../../android-sdk-macosx”
- Install at least Platform Tools and the latest platform using the SDK Manager.
- Create initial_setup:
#!/bin/bash
# Set the Android SDK path in Eclipse. Must be the absolute; a relative path
# does not work with the AVD Manager.
cd "$(dirname "$0")"
sdk_path=`pwd`/android-sdk-macosx echo
"Setting Android SDK path in Eclipse..."
echo com.android.ide.eclipse.adt.sdk=$sdk_path >> ./workspace/.metadata/.plugins/org.eclipse.core.runtime/.settings/com.android.ide.eclipse.adt.prefs
echo "Android SDK path set."
# Create a new AVD echo
"Creating new AVD..."
echo no | $sdk_path/tools/android create avd -n Android41 -t 1 --force
echo "AVD created." - Change permissions of initial_setup: chmod 754 initial_setup
- Zip up the directory!
WINDOWS INSTRUCTIONS
Here’s what the final unzipped directory structure will look like. This is what we’re building:
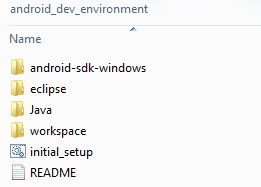
- Create the root directory (android_dev_environment).
- Install JDK 6 at android_dev_environment\Java. In the installer, we only need to install Development Tools and the Public JRE (not the Java DB or Source Code).
- Install/copy the Android SDK in (android-sdk-windows).
- Copy in eclipse:
- Start with a clean version of Eclipse
- Edit eclipse\eclipse.ini. Add the following lines above the -vmargs line:
-vm
..\Java\jdk1.6.0_35\bin\javaw.exe (make sure the jdk path is correct!) - Run Eclipse. When prompted for a workspace, enter “../workspace” (this will create the workspace directory in our root).
- Install the ADT Plugin via the “Install new software” option in Eclipse (https://dl-ssl.google.com/android/eclipse/). Restart when done.
- Change the Android SDK path in Eclipse preferences to be relative: “..\android-sdk-windows”
- Install at least Platform Tools and the latest platform using the SDK Manager.
- Create initial_setup.bat:
REM Set the Android SDK path in Eclipse. Must be the absolute;
REM  a relative path does not work with the AVD Manager.
cd > temp.txt 2>&1
set /p sdk_path= < temp.txt
del temp.txt
set sdk_path=%sdk_path%\android-sdk-windows
set sdk_path=%sdk_path:\=\\%
set sdk_path=%sdk_path::=\:%
echo “Setting Android SDK path in Eclipse...”
echo com.android.ide.eclipse.adt.sdk=%sdk_path%>> .\workspace\.metadata\.plugins\org.eclipse.core.runtime\.settings\com.android.ide.eclipse.adt.prefs
echo “Android SDK path set.”
REM Create a new AVD
echo “Creating a new AVD...”
echo no | .\android-sdk-windows\tools\android create avd -n Android41 -t 1 --force
echo “AVD created.”
pause - Reset the eclipse.ini -vm path to a relative one (see Step 4B above). Apparently when you run Eclipse it updates this path to an absolute value.
- For 64 bit Windows, we also need to edit the find_java.bat file in the Android SDK so that it finds the Java installed with the bundle. Add the following lines to android-sdk-windows\tools\lib\find_java.bat (before it runs its own check that starts with the comment “rem Check we have a valid Java.exe…”):
set java_exe=%~dp0\..\..\..\Java\jdk1.6.0_33\bin\java.exe
set javaw_exe=%~dp0\..\..\..\Java\jdk1.6.0_33\bin\javaw.exe
if defined javaw_exe goto :EOF - Zip up the directory!
Note: Running the initial_setup script on a Mac or a PC multiple times does not hurt anything. The dev environment will break if you move the whole directory after running initial_setup, but running initial_setup from the new location will fix it. It might help to include a README file with the bundle explaining this and any other tips or troubleshooting advice you want to share.
Anybody have any similar solutions for Linux or another IDE like IntelliJ? If so, leave a note in the comments! :)
source blog teamtreehouse
Artikel Lainnya :
Android


